The basics
- Download CORE.
- Download and install Xcode (for Mac) and/or Microsoft Visual Studio (for Windows).
- Build the sample plug-in(s) of your choice.
- Duplicate and modify the Skeleton plug-in to start your own.
macOS
Illustrator and macOS have been around for many years, so system compatibility can get confusing; however, this list and very minor modifications to Xcode will fix you up.
Xcode 12 or above is required to develop Illustrator plug-ins for macOS using CORE. We have tested full compatibility up to Xcode 16.4.
- To distribute plug-ins for macOS Catalina or later (10.15), you will need Xcode 12 or later to notarize your binary. Please refer to Apple's documentation on how to do this.
- To develop plug-ins for Illustrator 2026 (Ai 30), you will need the OS 12.3 SDK. This is included in Xcode 13.3.
- To develop plug-ins for Illustrator 2024 (Ai 28) and 2025 (Ai 29) on Apple Silicon, you will need the OS 11.3 SDK. This is included in Xcode 12.5.
- To develop plug-ins for Illustrator 2024 (Ai 28) and 2025 (Ai 29) on Intel, you will need the OS 10.15 SDK. This is included in Xcode 12.0.
To be able to compile against all versions of CORE, your Xcode app will need to be modified for legacy support. We recommend downloading Xcode 16.4, 13.3, 12.5, and 12.0. Otherwise, you will only be able to compile against the version of CORE corresponding to the macOS SDK versions listed above.
Only the older macOS SDKs are required to develop for older versions of Illustrator in Xcode 16 (not e.g. the older compilers or linkers); if you'd like to modify Xcode 12-16 to compile for all versions of Illustrator, simply extract the MacOSX10.15.sdk, MacOSX11.3.sdk, and MacOSX12.3.sdk folders from each older version of Xcode and copy them into the Xcode.app/Contents/Developer/Platforms/MacOSX.platform/Developer/SDKs folder of Xcode 13-16, and modify the associated Info.plist file there to remove the "MinimumSDKVersion" entry.
You might find that the OS 10.15 SDK is lacking the standard C++ #include headers; in this case, extract the OS 10.13 SDK from Xcode 9.4, and copy the MacOSX10.13.sdk/usr/include/c++ folder to the same "include" subfolder in the OS 10.15 SDK.
Windows
Microsoft Visual Studio 2022 or above is required to develop Illustrator plug-ins for Windows using CORE.
Hot Door uses Microsoft Visual Studio 2022 and has not tested later versions, if any.
No modifications or additional downloads are needed to develop plug-ins for Illustrator 2024 through 2026 (Ai 28-30), other than standard components like MFC, toolset v143, support for x86-64 and ARM64, and the Windows 10 SDK.
CORE sample plug-ins
CORE contains four sample plug-ins: Annotate, Panel, Skeleton, and Tool.
The Annotate sample implements a simple rectangle drawing tool, which annotates its geometry during dragging.
The Skeleton sample simply acts as an empty plugin that performs no function, but which Illustrator recognizes and loads successfully. This is to provide a good foundation on which to start building your own plugin (see below).
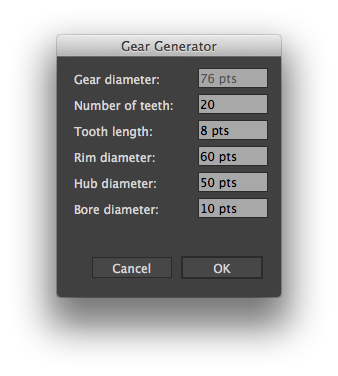

The Tool plug-in implements a gear drawing tool. This demonstrates the creation of tools, modal dialogs with UI elements, preferences, and Illustrator art drawing.

The Panel plug-in demonstrates the creation of panels with UI elements, notifiers, timers, and Illustrator art object iteration.
CORE Skeleton plug-in
The easiest way to get your plug-in started using CORE is to duplicate and modify the Skeleton plug-in as a starting point.
- Create a new project folder and copy the contents of the Skeleton folder to the new project folder.
- Create a Libraries folder (anywhere is fine) and copy hdi_core into it. You do not need to copy the Samples or Documentation folders.
- Open the project file in Xcode or Visual Studio.
- Delete the hdi_core folder from the Libraries group and add the new hdi_core folder that you just placed into your Libraries folder.
You have two choices at this point: either start working with Skeleton as-is and add your own code, or follow these instructions to eliminate all traces of "Skeleton" and "skel" from your project.
- First, come up with a name for your project. If the name is long, you may want a shortened version for some of the config files. For example, "skel" is used in place of "skeleton".
- In the Configs folder, change the 'skel' portion of the file names to match your project
- In all of the config files (except skel-shared.xcconfig on Mac) edit the #include line to the name you just changed.
- In Headers, change skelPlugin.h file name to your new name.
- In Projects, change the project names to match your new name.
- In Sources, change skelPlugin.cpp and skelSetup.cpp to match your new name.
- For Mac, open Skeleton*.xcodeproj with a text editor and replace all instances of "Skeleton" and "skel" with your new name.
- For Windows, open Skeleton*.sln, Skeleton*.vcxproj, Skeleton*.vcxproj.filters, and Skeleton*.vcxproj.user with a text editor and replace all instances of "Skeleton" and "skel" with your new name.
- For Mac, in Configs/skel-shared.xcconfig, change the paths to CORE.
- For Mac, open Info*.plist with a text editor and change as necessary.
- In the header file, change the namespace name from "skel" to your new name
- In the Resources/PiPL.json file, change references to Skeleton to match your new name.
- Open the project files in Xcode or Visual Studio.
- Now add the appropriate .a / .lib binary files to the targets.
- Choose the desired target and build. The plug-in will install into /Applications/Illustrator <X>/Plug-ins (on Mac) or C:\Program Files\Adobe\Adobe Illustrator <X>\Plug-ins (on Windows). You may change this install path as necessary.